It is recommended that duplex steels should only be used at temperatures between −40 and 250–325 °C as they may become brittle outside this temperature range. They have high resistance to stress corrosion cracking (SCC) while resistance to uniform, pitting and crevice corrosion varies between moderate and excellent, depending on the grade.
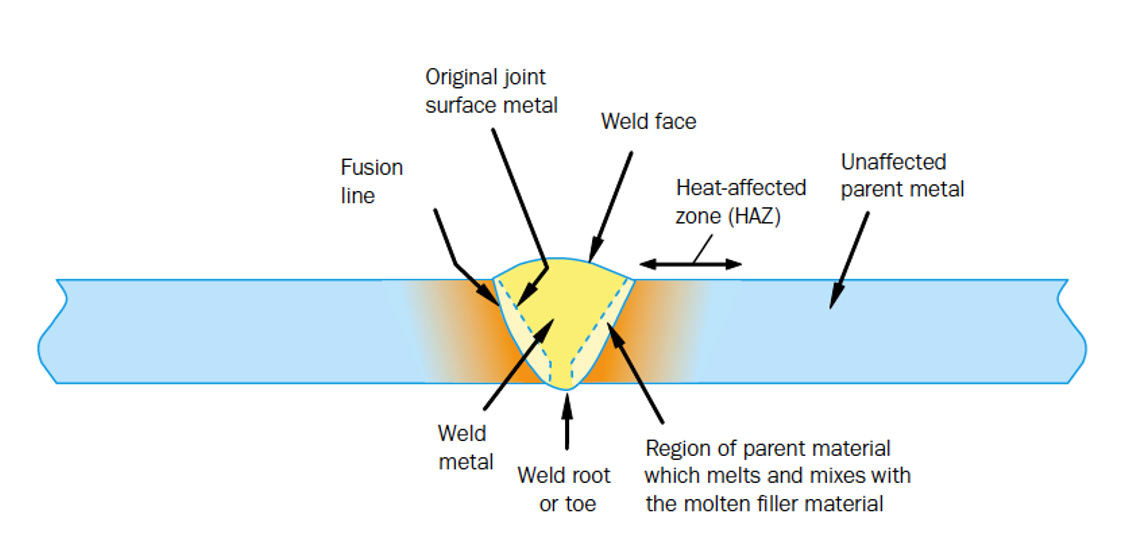
Figure 1 – The different parts of a weldment.
Welding duplex stainless steels – not difficult, but different
It should be emphasized that the welding of duplex stainless steel is not particularly difficult. But it is different to other steels. In fact, the weldability and welding characteristics of duplex stainless steels are better than those of ferritic steels, although not generally as good as austenitic steels. Modern duplex steels with significant nitrogen content are readily weldable. However, the properties of a duplex weldment (see Figure 1) are strongly affected by the welding parameters such as heat input. Therefore, correct welding procedures should be followed in order to obtain an acceptable weldment structure and properties.
Duplex steels usually solidify with a fully ferritic structure with austenite nucleation and growth during cooling. Rapid cooling from high temperatures may still result in high ferrite levels in the weld metal and adjacent base metal. Therefore, filler metals are specially designed with higher nickel contents to produce a phase balance similar to that of the base material. For the same reason, autogenous welding (without filler) is generally not recommended for duplex steels. Even if duplex steels are not fully resistant to solidification and hydrogen cracking, this is a less significant issue than for some other stainless steels. The duplex microstructure is more sensitive to the effect of subsequent passes compared to standard austenitic grades.
The issue of phase balance
The first generation of duplex stainless steel (453S) was developed over 90 years ago. Figure 2 illustrates the issue that arises during welding due to the increased proportion of ferrite.
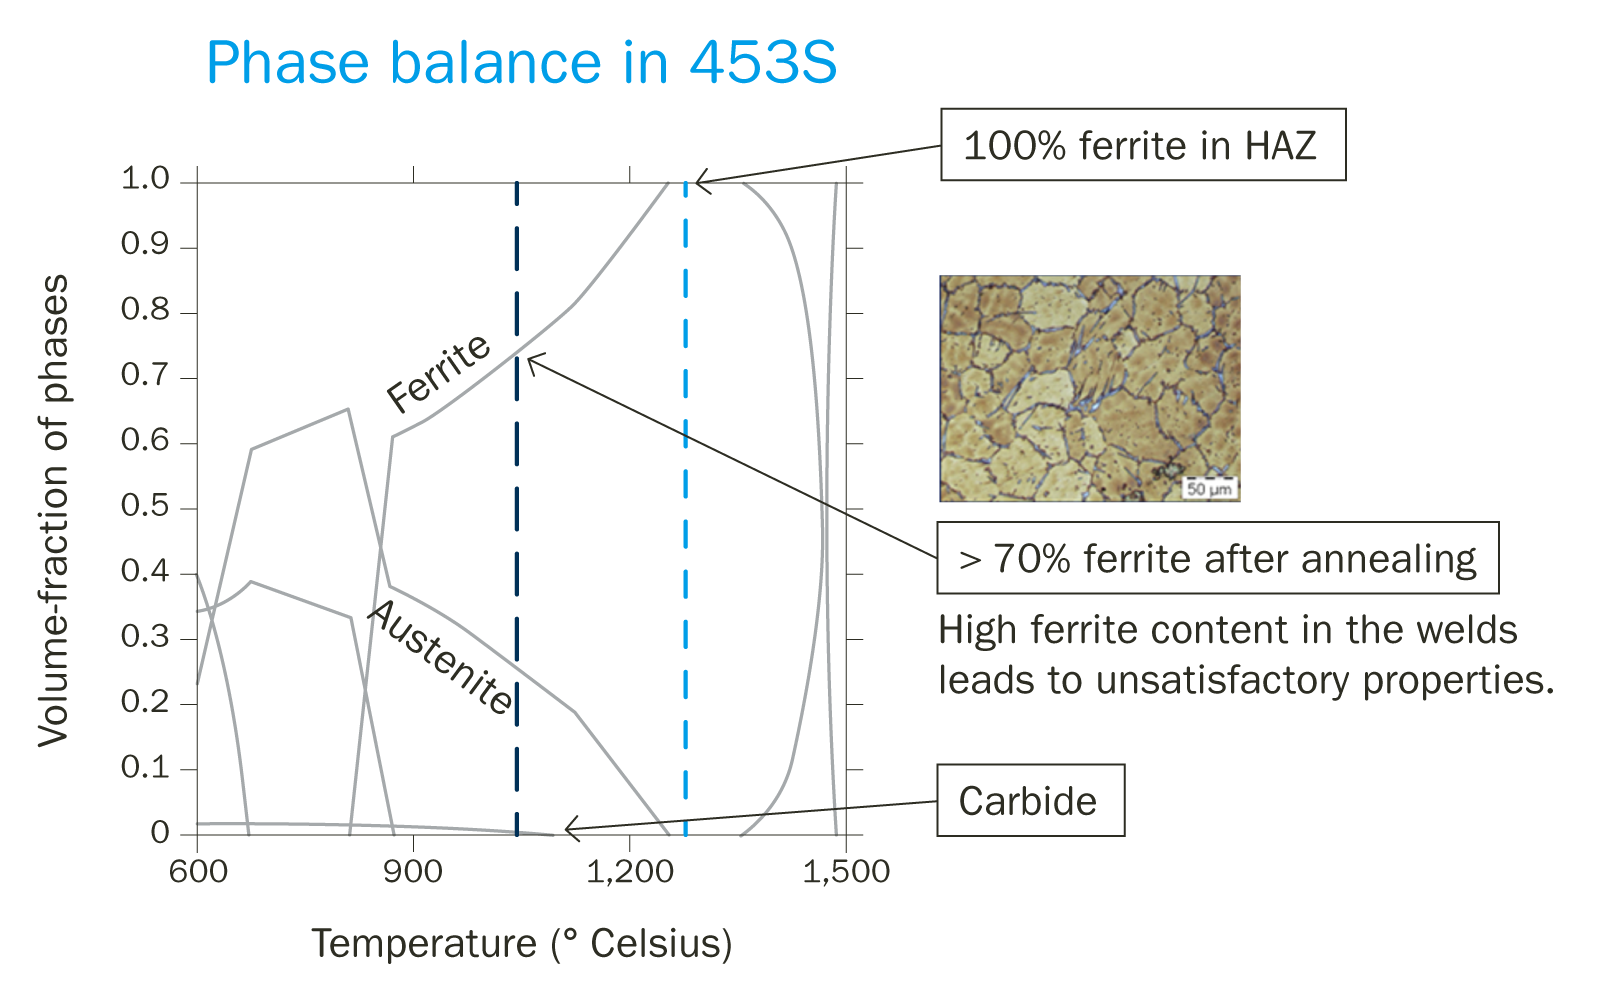
Figure 2 – The phase balance after welding 453S.
The situation improved with the second generation of duplex stainless steels such as 2205 – see Figure 3.
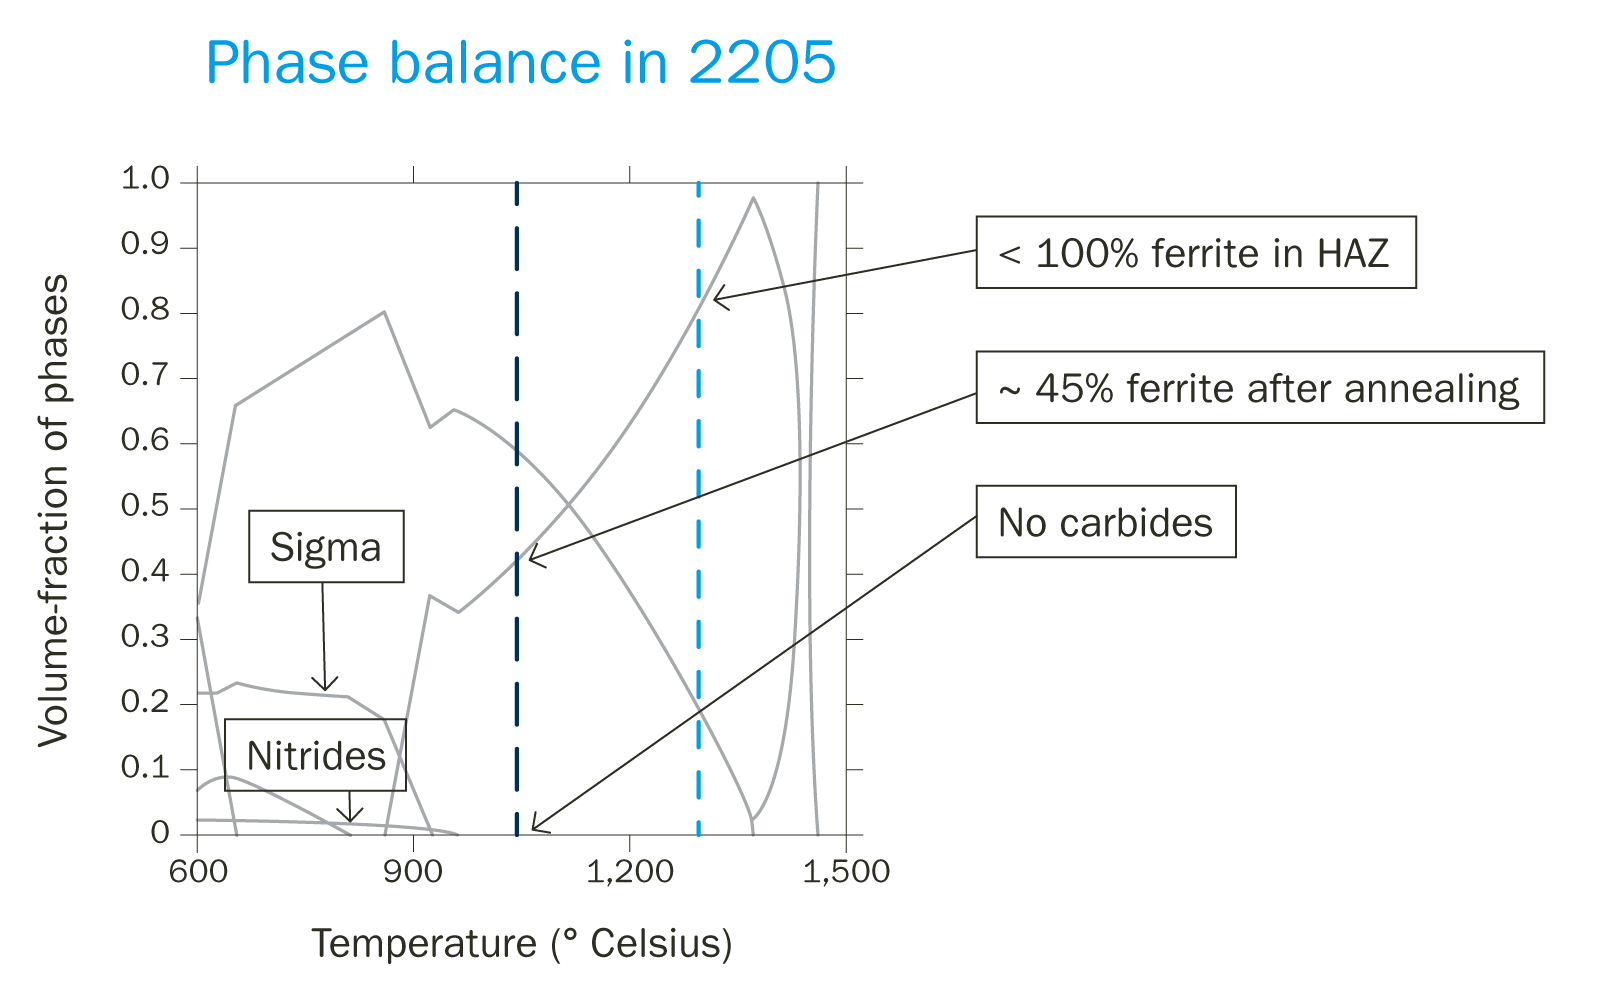
Figure 3 – The phase balance after welding 2205.
As illustrated in Figure 4, there are now several generations of duplex grades.
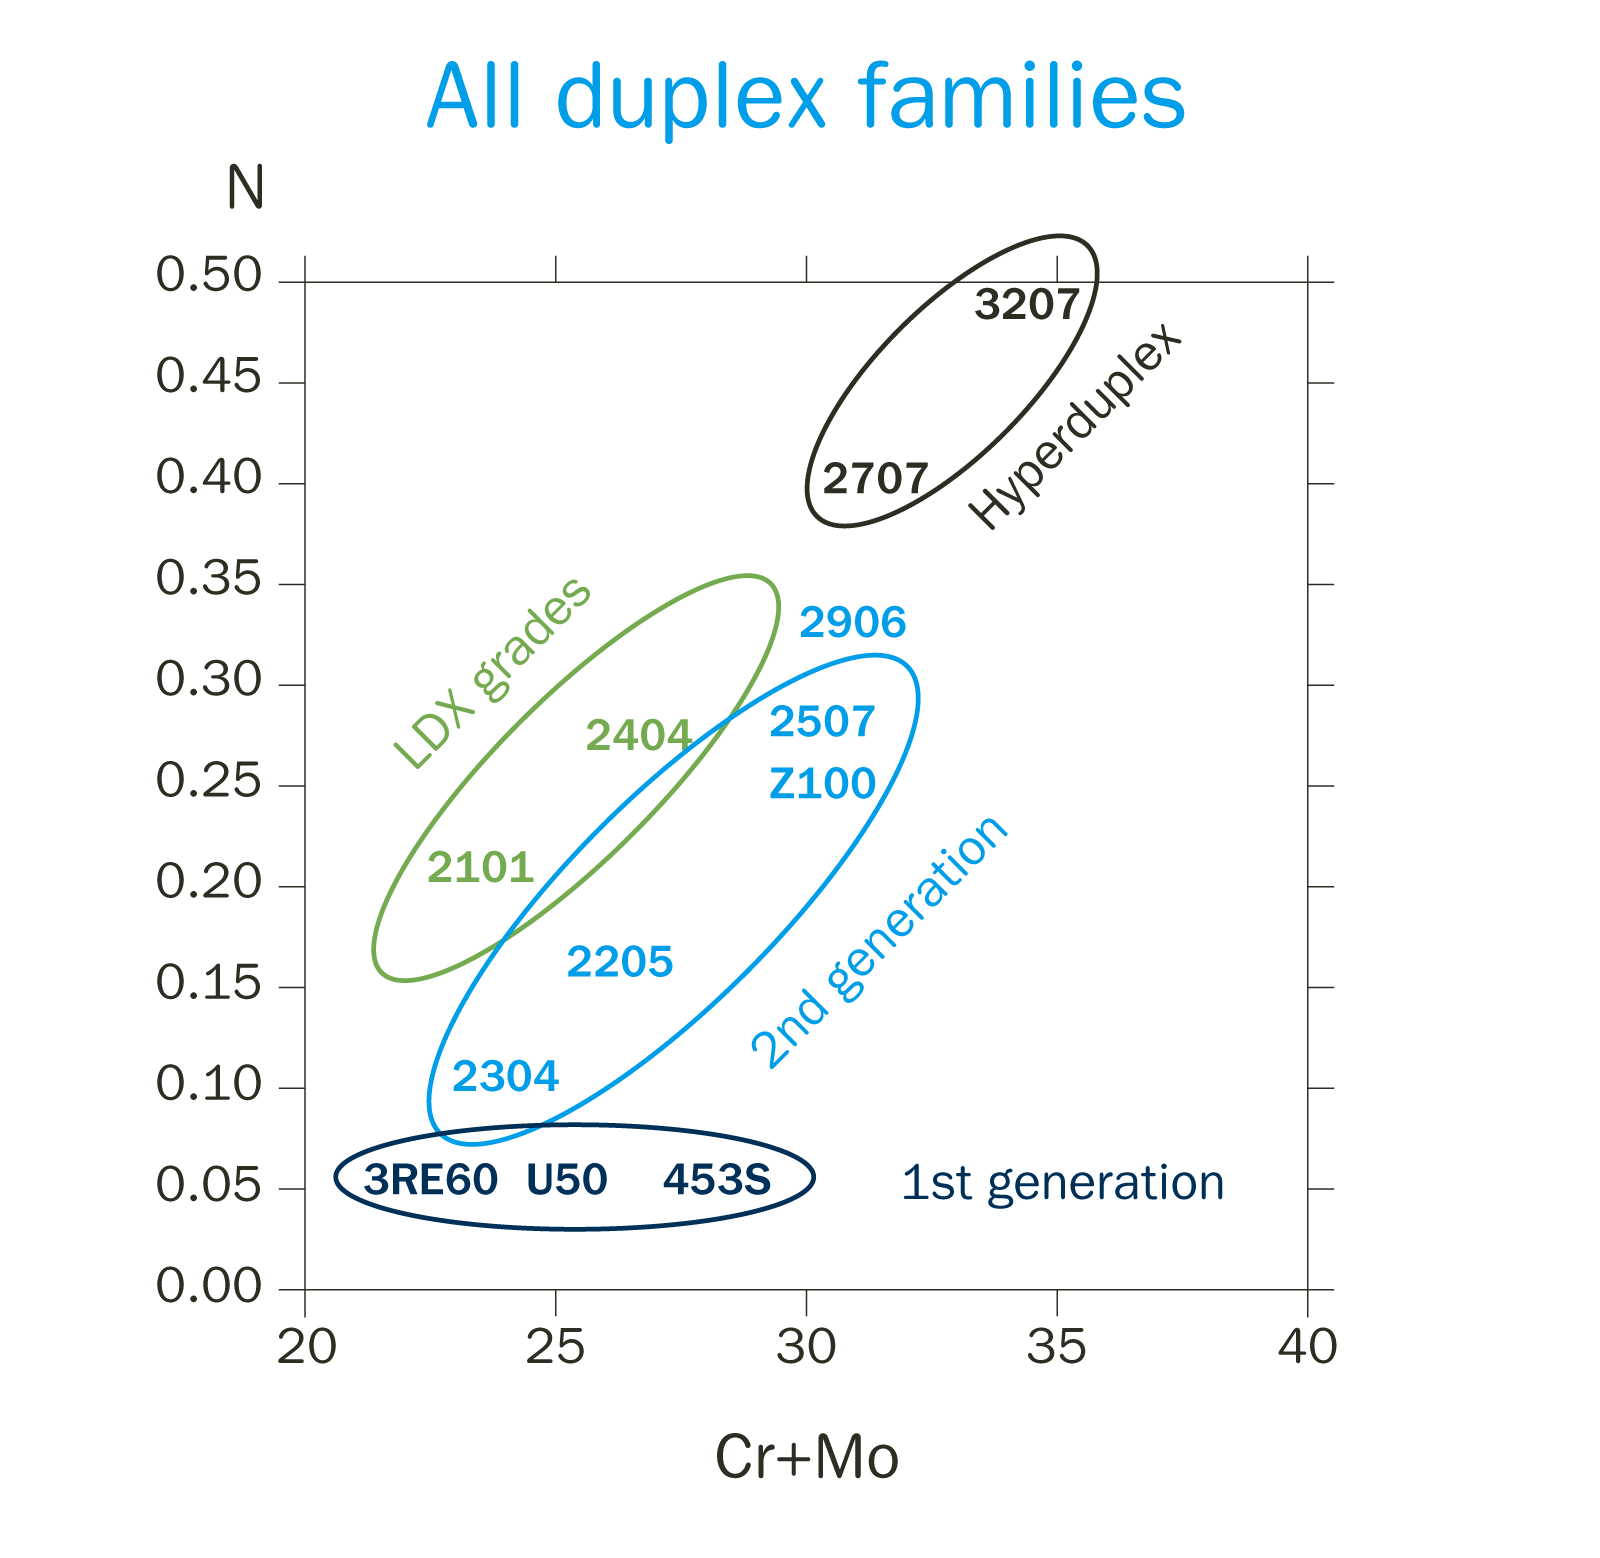
Figure 4 – The extended duplex family.
The phase balance diagrams shown here are based on thermodynamic calculations. There are other important tools used to predict the constitution of stainless steel weld deposits such as Schaeffler diagrams and WRC 92 diagrams. Unfortunately, they cannot be used directly for duplex grades. Therefore, practical methods are required.
The Ferrite Scope and Ferrite Number (FN)
The Ferrite Scope, as shown in Figure 5, uses induction to measure the magnetic permeability of a material – its ability to support the formation of a magnetic field. The hand-held device is easy to set up and use. The operator simply has to place the probe on the surface of the specimen, the reading in terms of the Ferrite Number (FN) is displayed automatically and stored in the instrument.
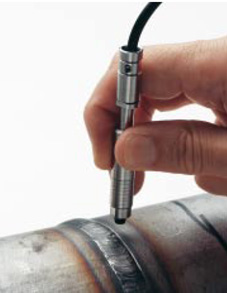
Figure 5 – The Ferrite Scope.
The FN of the weld metal is regarded as approximately equivalent to the percentage ferrite content, particularly at low FN values. However, some investigations suggest that the FN may overstate the volume percentage of ferrite at higher FN by a factor in the order of 1.3 to 1.5, which depends to a certain extent upon the actual composition of the alloy in question.
Outokumpu’s own experience has shown that the FN measured using a Ferrite Scope can vary considerably depending on the surface treatment and position where the measurement is made – see Figure 6. The measurements shown are made on base material but they are shown to emphasize that high precision or accuracy cannot be expected in measurements with the Ferrite Scope.
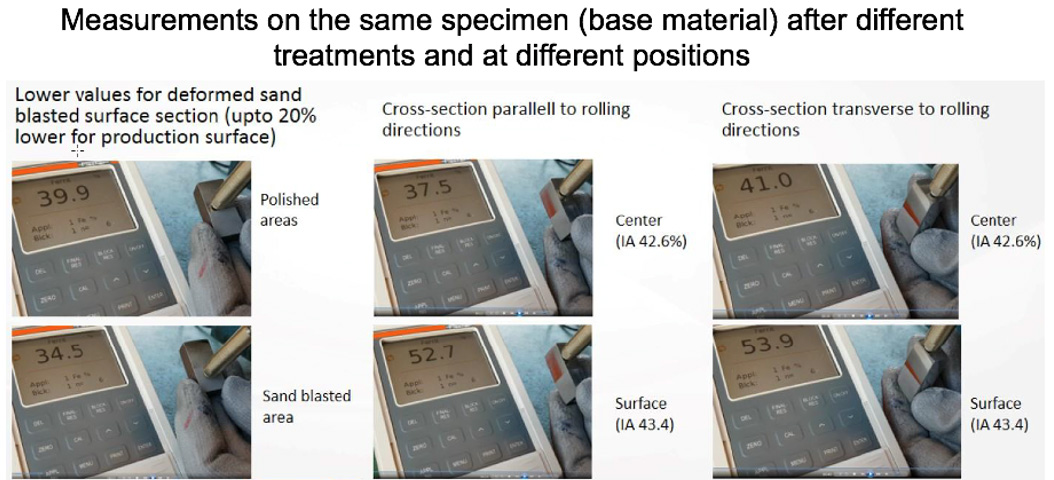
Figure 6 – Illustrating the variability of FN produced by a Ferrite Scope.
Standards have different requirements
The standards developed by various bodies have varying requirements according to the specific application – see Figure 7.
| Standard | Application | Allowed Ferrite | ||
| BM | HAZ | Weld | ||
| ISO 17781 | Petrochemical | 35-60 | 30-70 | |
| ISO 1516-3 (NACE) | Oil & Gas | 30-70 | ||
| API 938C (API) | Oil refining | 30-65 | 40-65 | 25-60 |
| M-630 | Offshore piping | 35-55 | 35-65 | |
| M-601 | Piping welds | 30-70 | ||
| EN 13445-4 | Pressure vessels | 30-70 2d from FL : <85% |
30-70 | |
Figure 7 – Variation in allowable ferrite content for duplex weldments.
There is a clear trend to set a 30-70% requirement for ferrite in the weld metal. But the scientific basis is perhaps less clear.
What is certainly clear is the consequences of extremely unbalanced microstructures. At 90% ferrite then the low percentage of austenite causes nitride precipitation in the ferrite, resulting in pitting. In contrast, with 10% ferrite there is a risk of stress corrosion cracking in the weld metal. This is shown in Figure 8.
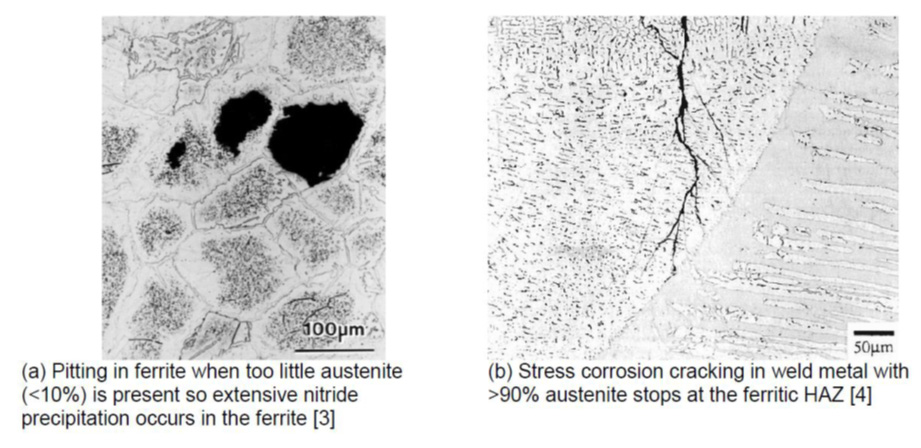
Figure 8. Illustration of possible consequences of extremely unbalanced microstructures.
There are though some confounding effects in play that make it difficult to separate the effect of ferrite content alone, as shown in Figure 9.
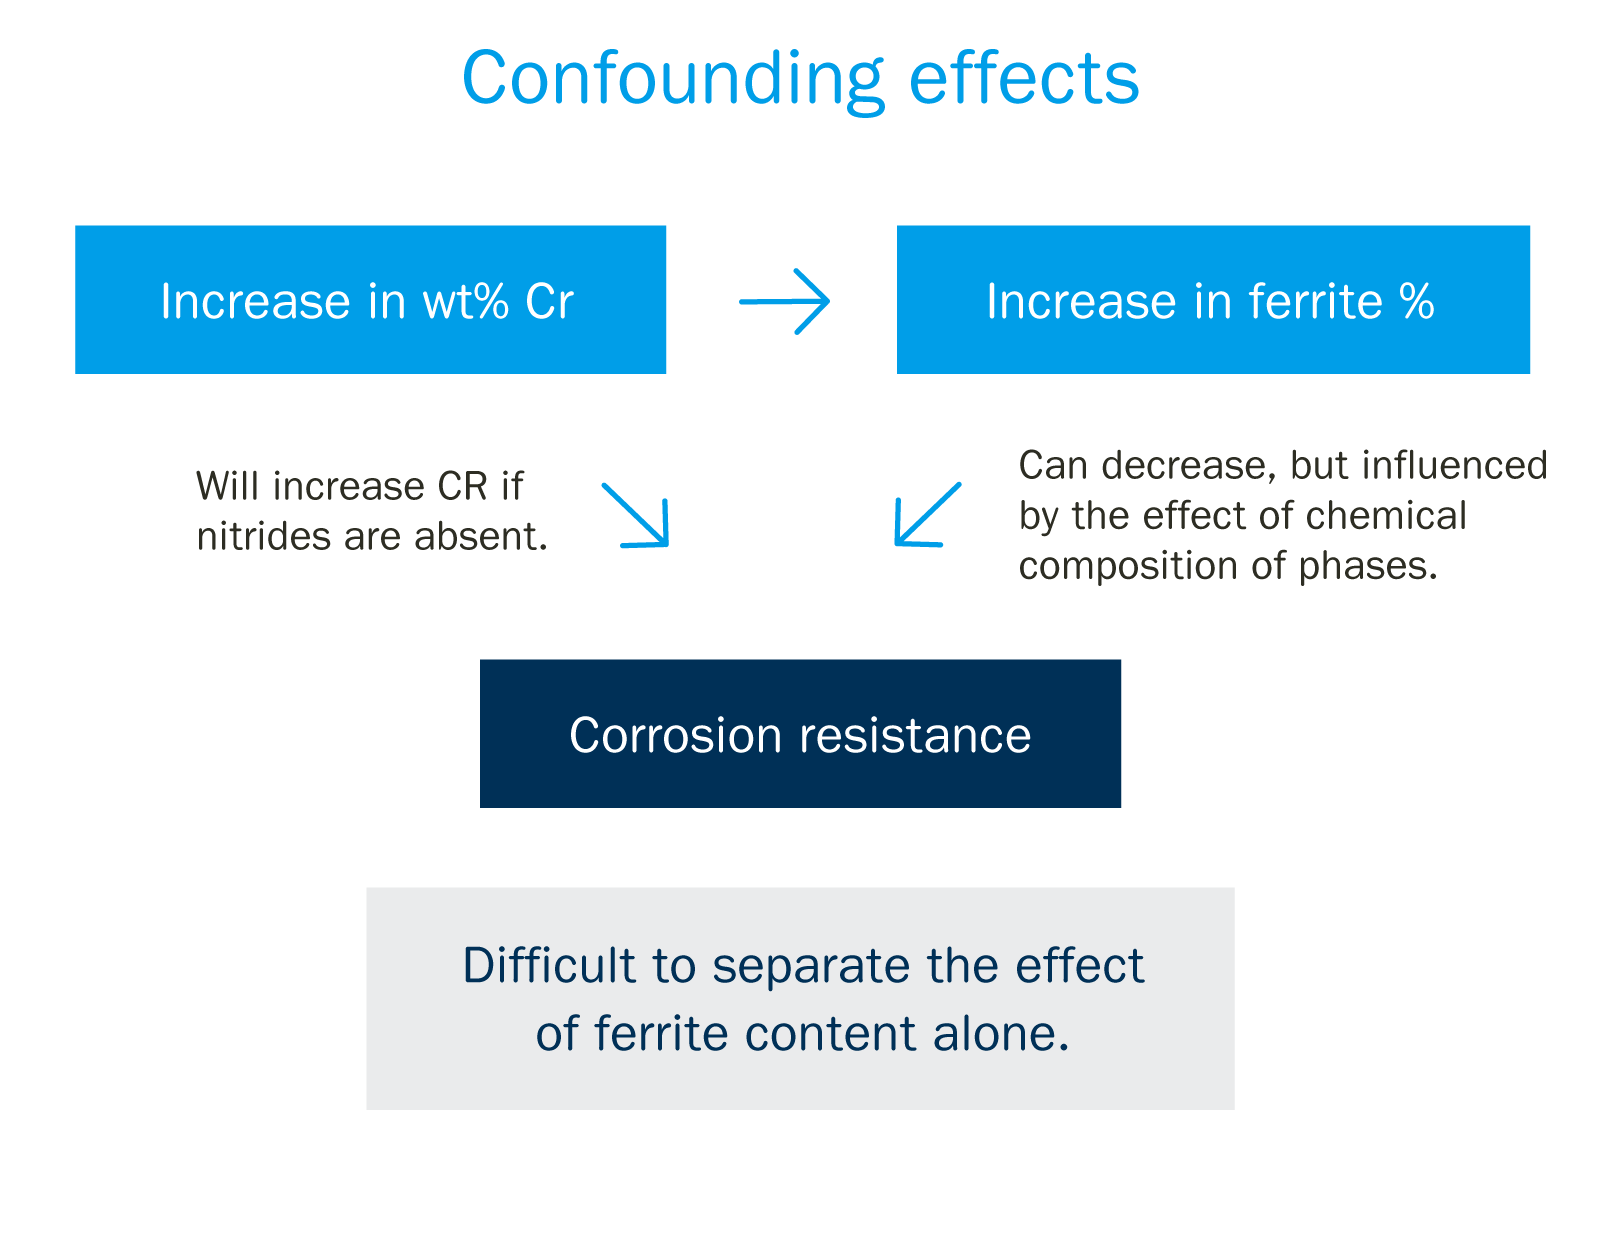
Figure 9 – The confounding effects that make it difficult to separate the influence of ferrite content.
A “hard” or “soft” requirement?
It is important to decide if the 30-70% ferrite requirement is a hard or soft limit. Does it in fact suggest that the mean and 95% confidence limits should be in the 30-70% range?
Taking a cue from impact testing, EN ISO 15614:2017 says:
“The average value of the three specimens shall meet the specified requirements. For each notch location, one individual value may be below the minimum average value specified, provided that it is not less than 70% of that value.”
Furthermore, an excerpt from excerpt from EN 13445-4:2016 says:
”The limit deviation on metallographic measurements are frequently of the order +/- 5%.”
Does this mean that the acceptable range is 25-75% in reality? The required precision is for 20% relative accuracy according to ISO 17781:2017. This is much higher than the 5% above.
To resolve this question, is it possible for property tests to be performed for borderline ferrite content?
The influence of intermetallics
Intermetallic phases and precipitates can have a significant influence on impact toughness and corrosion resistance. Therefore, the welding metallurgy of duplex stainless steel must also consider their presence. The requirements of various codes are shown in Figure 10.
| Standard | Year | Addl. | Requirement |
| Norsok M630 | 2010 | Base matl. Offshore piping | Free from intermetallics |
| Norsok M630 | 2013- | " | Free from detrimental intermetallics and precipitates |
| DNV-FS-101 | 2013- | Submarine piping | α < 0.5%; total < 1% |
| ISO 1516-3 | 2015 | Oil & gas | α < 0.5%; total < 1% |
| Norsok M-601 | 2016 | Piping welds | Total < 0.5% |
| ISO 17781 | 2017 | Petrochemical | Max dimension < 10 µm |
Figure 10 – Code requirements for intermetallics in duplex weldments.
Nitrides in weld metal – a further challenge
The standard DNV-RP-F112:2008, Design of Duplex Stainless Steel Subsea Equipment Exposed to Cathodic Protection, notes that Hydrogen induced stress cracking (HISC) is a potential problem. And materials with an austenite spacing less than 30 μm (micrometers) are considered as satisfactory according to this standard. A footnote in this standard also says:
“The limit of 30 micrometers is not a strict limit, since the uncertainty of austenite spacing results are often of the same order as the results themselves. However, the number is included in this Recommended Practice as a guidance value.”
Nitrides in the weld metal are known to increase the risk for HISC. However, this is not directly specified and monitored. Instead, impact and corrosion tests are specified. Also, design guidelines are given to reduce service strains and stresses in the welds.
Pitting corrosion
Determining the risk of pitting corrosion is another important aspect of the welding metallurgy of duplex steels. This is again an area that is not completely clear cut. This is because test methods and acceptance criteria can vary between parties and detailed choices can have a decisive influence on the test result. It is possible that tests may fail on a “questionable basis”, involving retests and discussions that can lead to costly delays.
While ASTM G48 is the best recognized test method, weight loss offers a simpler criterion. But the results can be influenced by surface preparation and pickling.
Conclusions – the inexact relationship between microstructure and properties
In the vast majority of practical cases, welding of duplex stainless steels can be regarded as different rather than difficult, and conformance to standards is not a problem. However, it is useful to have some familiarity with the different ways that standards might be interpreted.
- An important aspect of standards for welding duplex materials is that they attempt to base their requirements on the resulting microstructure. While this philosophy is correct, the relationship between microstructure and properties is not always exact.
- There can be considerable uncertainty in the quantitative measurement of microstructural features. This explains the uncertainty that sometimes occurs in the requirements in the standards and in the differences between them.
- The same uncertainty exists even when properties are specified because the requirements are based on experience (or on a small study which is extended and generalized).
In situations where a customer is unsure of the specific requirements of a standard or needs guidance in determining the best approach to welding duplex stainless steel, then the best approach is to seek expert advice from the steel manufacturer. Outokumpu has a team of welding metallurgists ready to provide a full range of technical support services.

